

Install a Room
Overview
If your community has been trained and approved for installing K4Connect Smart Home devices independently, your team will have access to the Install a Room feature of K4Ops. To learn more about how to install a room step by step, follow the instructions below.
Getting Started
Your Home Hub may need to complete updates, so we recommend plugging in the Home Hub with the Z-Wave USB for at least 10 minutes prior to pairing; the Z-Wave USB can be plugged into any USB port of the Home Hub.
When the Home Hub is first plugged in, the Z-Wave will flash blue, but will not always stay blue. The Home Hub will flash red and green (tiny lights within the interior, hard to see, but there).
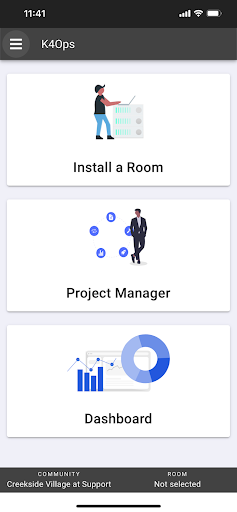
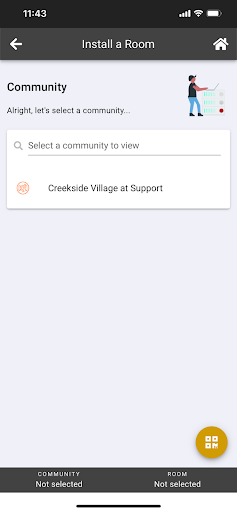
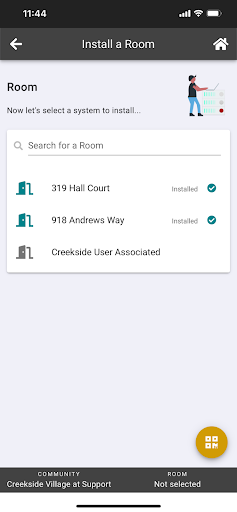
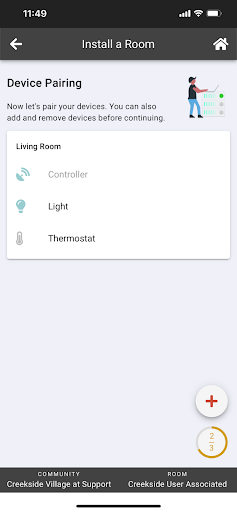
Upon logging into the K4Ops app, you will be presented with three cards: Install a Room, Project Manager, and Dashboard. To find your community, press Install a Room. Today we will be working in the Creekside Village at Support community. Once you select your community, select the room you wish to work in. We will be working in Creekside User Associated. Please take note of the grey icon to the left of the name of the room; this represents the fact that the room has not been installed yet. Once installed, the icon will transition to green and will gain the installed checkmark.
When first arriving at the room you will be working in, the light in the top right corner must change from red to green, indicating that the K4Ops app has successfully connected to the controller. Additionally, you can expect the controller icon to be light green and the device icons to be gray — this indicates that the devices are not yet paired. You will be unable to move past this screen until all devices are paired.
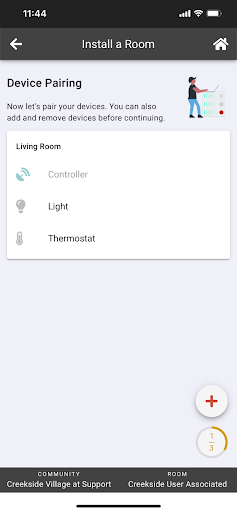
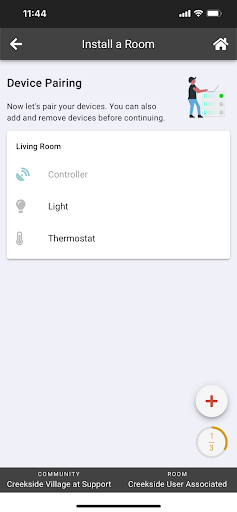
Once in the room, the gray footer at the bottom of the screen will report which community you are viewing on the left hand side, and the room name/number on the right hand side. When you return to the previous screen listing all rooms, the footer will remain active for your most recently viewed room. Handy in the case that you forget what room you were just working on!
How to Pair Devices
Following the determination that you have successfully connected to the controller, it is time to begin pairing the devices. As stated previously, devices that are not paired are represented by a gray icon. Devices that have successfully been paired are represented by a green icon.
How to Pair a Smart Switch
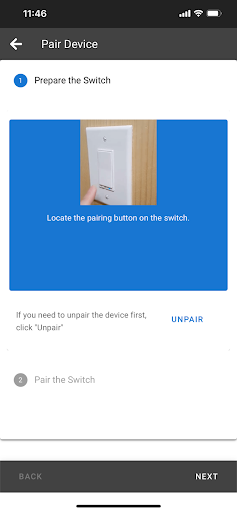
In the following example, we will be walking through the steps to pair a Smart Switch. To begin pairing, select the device by simply tapping on the device line.
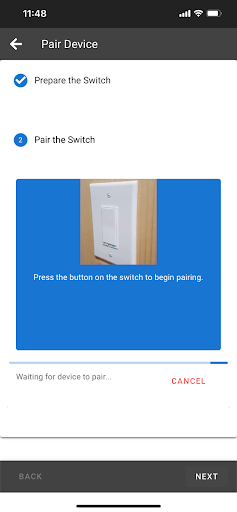
After making your selection, you will be presented with a prompt to locate the physical device. After clicking ‘Next’, you will be prompted with specific instructions pertaining to your device needing to be done in order to initiate the pairing process. In this instance, we are prompted to press the button on the switch to begin pairing. Please note: when pairing switches, you can press the top OR the bottom of the switch, either way will send the same configuration to the Home Hub.
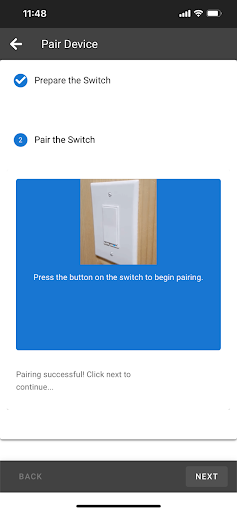
Once the device has paired to the Home Hub, you will receive a note stating that the pairing was successful. Simply click next, to which you will be redirected to the room overview and the device will now reflect a green icon. Please note the counter in the bottom right corner — this signifies how many devices are paired out of the total devices in the room. Once this counter has reached the total number of devices (in this example, it would be 3/3) you will be directed to the testing phase.
How to Pair a Smart Thermostat
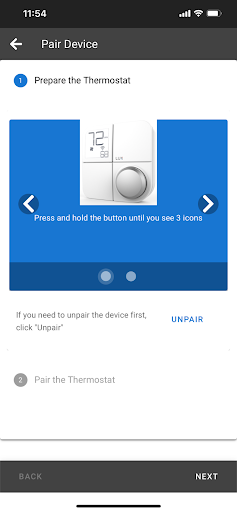
In the following example, we will be walking through the steps to pair a smart thermostat, specifically the KONOse Thermostat. To begin pairing, select the device by simply tapping on the device line.
After making your selection, you will be presented with a prompt to prepare the thermostat by pressing and holding the main knob until you see 3 icons. After clicking ‘Next’, you will be prompted with specific instructions pertaining to your device which will be done physically in order to initiate the pairing process.
Adding a New Device
When adding a new device to a room, follow the on-screen instructions to select the following parameters:
- Group: type of device (thermostat, light, etc.)
- Device: specific model of device being used (*see list below for product examples)
- Room: where the device will physically be located
- Device name: the name that will appear in the K4Ops app. Please note that this should match the group name
For example, when adding a new KONOse Thermostat, the following parameters should be followed:
- Group: Thermostats
- Device: Kono SE Thermostat
- Room: Living Room (or whichever location the device is physically located)
- Device name: Thermostat
Upon successful installation, the device would then appear as “Living Room Thermostat” in both the K4Ops app and the K4Community Plus app.
Active Device Options
Below you will find the active K4Community Smart Home devices that are currently deployed in communities. If for any reason you do not see a device that you are troubleshooting, or if you have any questions, please contact our K4Support Team.
| Device Category | Consumer Device Term | K4Ops App Device Term |
|---|---|---|
|
Controller |
Home Hub |
Controller |
|
Fans |
Smart Ceiling Fan Switch |
Jasco 14287/14314 Fan Switch |
|
Lights |
Smart Switch |
Z-Wave Switch |
|
|
Smart Dimmer |
Z-Wave Dimmer |
|
|
Smart Motion Switch |
Jasco 26931 Motion Sensor + Switch |
|
|
Smart Motion Dimmer |
Jasco 26933 Motion Sensor + Dimmer |
|
|
Smart Electrical Outlet |
Jasco 14315/14288 Electric Outlet |
|
|
Smart Lamp Module |
Jasco 28168/28169/28172/28173 Lamp Module |
|
Remotes |
Smart Handheld Lighting Remote |
Remotec ZRC-90 8-Button Remote |
|
Sensors |
Smart Leak Sensor |
Jasco 43985 Leak Detector |
|
|
Smart Motion Detector - Battery Powered |
GE Z-Wave Smart Motion Sensor |
|
|
Smart Motion Detector - Plug-in |
HomeSeer HSM200 Plug-in Multisensor |
|
|
Smart Bed Occupancy Sensor |
Bluetooth bed sensor |
|
Thermostats |
KONOse Thermostat |
Kono SE Thermostat |
Completing Installation
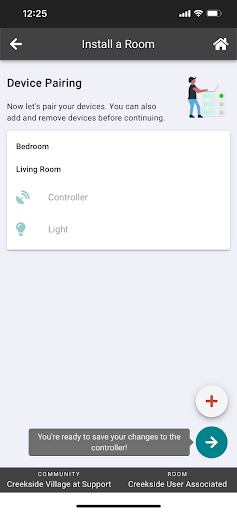
Once all devices in the room have been paired successfully, you will be presented with a prompt stating “You’re ready to save your changes to the controller!” Press the arrow to move to the next screen to save changes.
Once you reach the next screen, and the changes have been saved successfully, the light to the right of the figure in the top right hand corner will change from red to green, indicating that the K4Ops app has successfully connected to the controller.
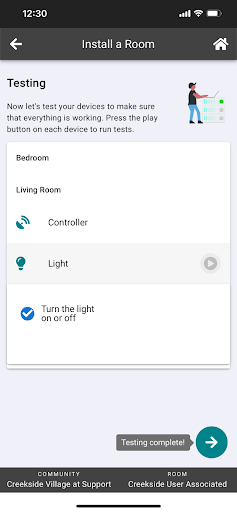
Upon changes to the controller being saved, you will then be prompted to test each device. Please note that you will need to physically remain in the room during testing AND the indicating light in the top right hand corner must be green (reminder: this green indicator light means that you are connected to the controller.)
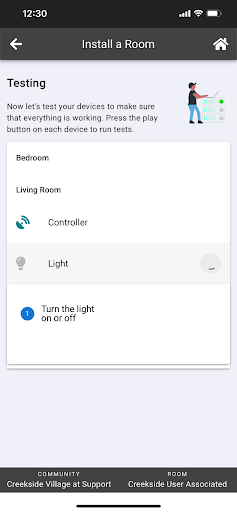
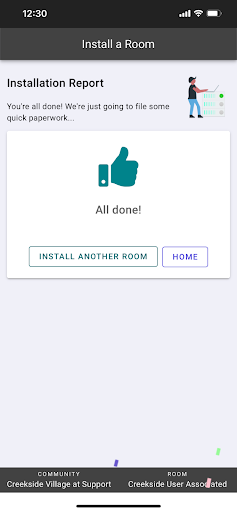
Once all devices have been tested, you will reach an installation report stating that all changes have been saved and installed successfully. Congratulations!
Alexa Devices
Occasionally, if K4Community Voice is actively deployed in your community you will see an Alexa device listed in the K4Ops app. When trying to complete an installation of a room, having the Alexa device listed will prevent moving on to the testing phase and ultimately a successful installation. If you see an Alexa device, simply swipe right on the device line to delete.
Upon successful completion of testing and installation, make sure the physical Alexa device is plugged into the wall and connected to your local K4Community Wifi network. This can be done by asking, “Alexa, what’s the weather?” If she responds as expected, she is indeed connected to WiFi and can now sync with the active smart home devices installed in the room. To initiate the sync, say “Alexa, discover devices.” Alexa will respond stating she is discovering devices and that the process might take a few moments. Once the devices are synced, you can test Alexa by asking for example “Alexa, turn off the bedroom light.”
Tips and Tricks
-
When first initiating an unpair/repair, if it does not immediately go through, try pressing the switch again. You won’t break it!
-
There is a counter in the bottom right hand corner that indicates how many devices are paired.
-
To edit or delete a room OR device, swipe right on the device line to be presented with the delete option -- swipe left to edit. On devices, you can also move a device to another room.
-
When pairing or unpairing a KONO thermostat, you can expect that the unpair/pair might take some time to complete on both the device and within the K4Ops app.