
Creating and managing events is easy to do in the Team Hub. Just click Event Manager in the left-hand menu bar.
Creating Events
To create an event:
- Click New Event
- Fill in the event fields (details below)
- Click Publish or Save as Draft
Check the Create another event checkbox to create another event immediately after publishing the current one.

Event Fields
Event Information
-
-
- Event Name - Required. The name of your event. We recommend keeping the names of events relatively short to improve visibility in the K4Community Plus app and on event widgets
- Description - Optional. Provide more details about the event if needed. The description can be long if you like. It is truncated in the K4Community Plus app with an option to read more if the residents prefer.
- Location - Required. List of custom locations that can be created and managed in the Event Manager Settings.
- Calendars - Required. List of custom calendars that can be created and managed in the Event Manager Settings.
- Virtual Event - Optional. Indicate whether this event is a virtual event taking place either in the K4Community Plus app or via Direct Broadcast.
- Show On TV Channel - Optional. If you have selected virtual event and you have K4Community Direct Broadcast, you'll see an option to show the event content over the DB channel.
- TV Channel - Required. If you have selected Show On TV indicate here which channel you'd like the content shown on.
- Video Source - Required. The options here are Link or DVD. Supported video links are publicly available YouTube or Vimeo links. The DVD option is only available if the TV Channel you've selected is set up for DVD.
-
Event Scheduling
- Start Date - Required. The scheduled date for the event
- Start Time - Required. The scheduled start time for the event
- End Time - Required. The scheduled end time for the event. Defaults to 1 hour after Start Time.
- Repeat Options - Optional. Indicate whether the event is repeating. Daily, Weekly, Monthly, or Custom.
- End Date - Optional. If the event is set to repeat, you'll be prompted to enter an end date. If you don't enter an end date the event will repeat indefinitely.
- Repeat Every - Required. If the event is set to repeat, you'll need to indicate how frequently the event is to repeat.
- Frequency - Required. If the event is set to repeat, you'll need to indicate the timeframe for how often the event will occur. Day(s) Week(s) or Month(s)
-
More Information
- External Signup URL - Optional. Entering a link to an external signup tool will turn the Attend button in the K4Community Plus app into a link to the signup tool. Check out this article for more detail on this field - How to use an external event sign-up manager
- Sign-up Comment Prompt - Optional. Enter a prompt that residents will see when tapping the Attend button to sign up for the event.
- Event Type - Optional. List of custom event types that can be created and managed in the Event Manager Settings.
- Costs Money - Optional. Checkbox to indicate whether the event costs money or not. If checked, the event will indicate "Costs money" in the K4Community Plus app.
- Limited Spots - Optional. Checkbox to indicate whether the number of signup spots available is limited. If checked, you must indicate a number in the Limited Spots field. Once the spots have all been filled, the event will change from showing "Attend" to showing "Waitlist" and any additional residents who sign up will be added to the waitlist.
- Calendar Widget Options - These options indicate how the event should appear on calendar widgets when creating slides or other content to share event information with residents.
- Hide from daily calendar - Optional. Hides the event from appearing on the Daily Calendar widget
- Hide from weekly calendar - Optional. Hides the event from appearing on the Weekly Calendar widget
- Hide from monthly calendar - Optional. Hides the event from appearing on the Monthly Calendar widget
- Truncate event name - Optional. If the event name is long enough that it would wrap to a second line on any given widget, the name will be truncated to take up only one line. This saves space when publishing event content to calendars where screen real estate is limited.
-
Managing Events
Edit events
To edit an event:
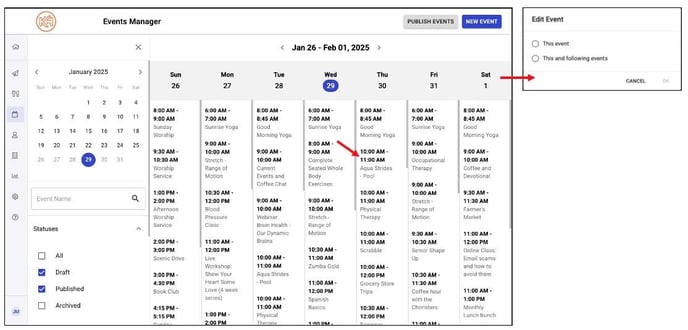
- Click on the event you would like to edit
- If the event is repeating, select either This event or This and following events. Selecting This event will edit just the one event instance you've selected. Selecting This and following events will apply the edits to the entire event series.
- Make your changes and click Publish or Save as draft
Delete events
To delete an event:
- Click on the event you would like to edit
- If the event is repeating, select either This event or This and following events. Selecting This event will allow you to delete just the one event instance you've selected. Selecting This and following events will allow you to delete the entire event series.
- Scroll to the bottom of the event details and click Delete
- Click Delete to confirm
Save published events as draft
Events that are saved as draft will still appear on the calendar in Team Hub, but will not be visible in the K4Community Plus app or any other endpoints where events might be published.
To save a published event as draft:
- Click on the event you would like to edit
- If the event is repeating, select either This event or This and following events. Selecting This event will allow you to set as draft just the one event instance you've selected. Selecting This and following events will allow you to set as draft the entire event series.
- Click the dropdown next to Publish
- Select Save as Draft. This will unpublish the event from any endpoints where it's currently published and will be available in Team Hub for future editing/publication.
Archive events
Archived events are removed from the Team Hub calendar view and from all endpoints where events might be published. They are still accessible in Team Hub by checking the "Archived" checkbox in Event Manager under Statuses.
To archive an event:
- Click on the event you would like to edit
- If the event is repeating, select either This event or This and following events. Selecting This event will allow you to set as draft just the one event instance you've selected. Selecting This and following events will allow you to set as draft the entire event series.
- Click the dropdown next to Publish
- Select Archive Event. The event will be immediately archived.
To access archived events, check the Archived checkbox under the Statuses section of the main events page.
