
Restaurant and menu data can be easily created and managed in the Team Hub under the Dining section located in the left-hand menu bar.
Creating Restaurants
To create a restaurant:
- Click on Edit Restaurants
- Click Add
- Enter the name of the restaurant
- Choose the Resident Group(s) that you wish to display this information to within the K4Community Plus app.
- Click Save
- For more on resident groups take a look at this article: How to create and manage Resident Groups

Managing Restaurants
Edit Restaurants
To edit a restaurant:
- Click Edit Restaurants
- Click into the name field of the restaurant you want to edit.
- Make your changes and click Save

Delete Restaurants
To delete a restaurant:
- Click Edit Restaurants
- Click Delete next to the restaurant you want to remove
- Click Confirm Delete
Deleting a restaurant will remove it and all related menus from TeamHub and K4Community Plus. The action cannot be undone.

Creating menus
To create a menu for an existing restaurant:
- Click New Menu
- Select the restaurant you want to add the menu to
- Enter the name of the menu
- Select the start date. This is the date the menu will begin to be available to the audiences you select later. Available start dates begin on the Sunday of the given week.
- Enter the menu cycle. This indicates how many weeks the menu will run
- Enter how many times the menu should repeat. This will repeat the menu from the beginning for the same number of weeks selected above.
- Select which meals will be on the menu and what time those meals will be available. Three meals are required, however if you do not enter menu items in a meal, that meal will not be read or shown on app, voice, or digital signage.
- Select your audience. This controls which endpoints the menu information is available on.
- Resident App shows the content on the residents' K4Community Plus app
- Friends and Family App shows the content on the friend and family version of K4Community Plus
- Resident Voice allows the content to be available when Alexa is asked for dining/menu details
- Click Save

Managing Menus
Edit Menus
 To edit an existing menu:
- Select the menu you want to edit
- Click the edit icon
- Make your changes. All available fields are editable
- Click Save
Add and Edit Menu Items
To add or edit menu items:
- Click the edit icon on the meal and day of the week you want to edit.
- Enter the name of the item in the Add Item field. As you begin typing, matching menu items that have been previously added will appear.
- Click to choose an existing menu item or click Create New to add a new item
- If you're creating a new item, select the category the item belongs to. The category choice list is static and not editable.
- Add an optional description of the item. This can be used to indicate price or calorie information or whatever other details you'd like to include.
- Click Save
The menu item will appear on the menu for that day of the week.

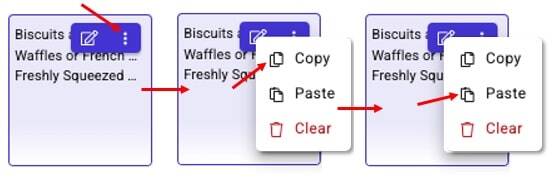
Copy and Paste Menus
You can also copy and past menus from one meal/day of the week to another
To copy and paste a menu:
- Click the 3-dot menu on the meal and day of the week you want to copy
- Select Copy
- Click the 3-dot menu on the meal and day of the week you want to paste to
- Select Paste
Pasting information into the menu will overwrite any existing menu items.
Delete Menus
 To delete a menu:
- Select the menu you want to delete
- Click Delete Menu
- Click Delete to confirm
Deleting a menu will remove it from all endpoints making is unavailable for resident or friends and family to access.