Content Creator and Library
Overview
Your community’s Content Library is a collection of the latest content that’s been uploaded or created by staff in your Team Hub. Content can be created in Team Hub by using the Content Creator, or staff can upload content that has been created outside of Team Hub in tools such as Canva or PowerPoint. Once content has been created or uploaded to the Content Library, staff can publish content to multiple end points, such as the K4Community Plus App, Direct Broadcast, Digital Signage, and Print.
Content Library Tour
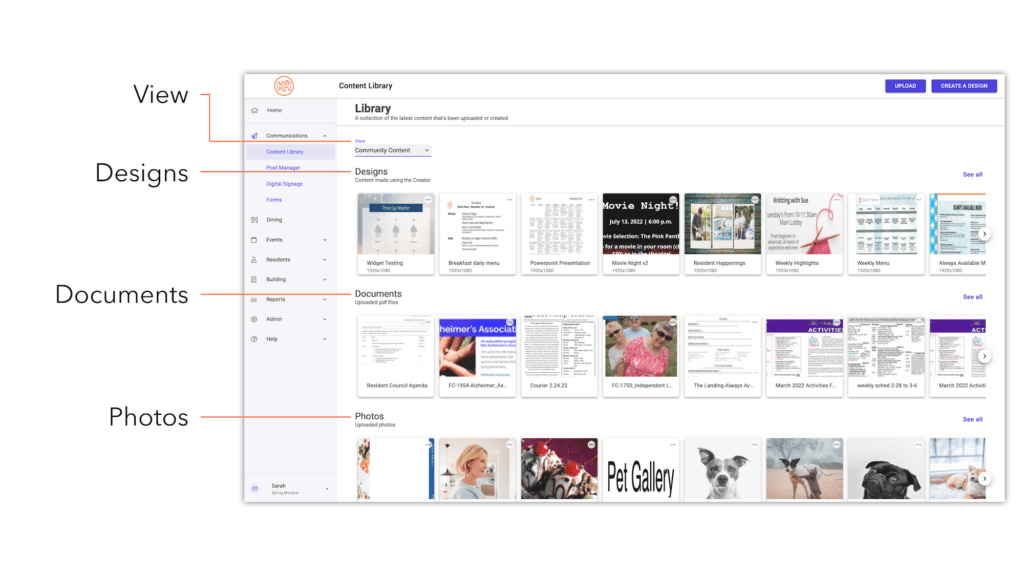
When you first open the Content Library, it will default to the My Content View, which displays the content that you, personally, have created.
To see all content created by you and your community team members, click the View dropdown and select Community Content. To switch back to your content, click the View dropdown and select My Content.
Viewing both ‘My Content’ and ‘Community Content’ not only helps staff stay organized with items they have worked on, but it also creates the ability for collaboration across teams.
The Designs section contains all content that has been made or edited in the Team Hub using the Content Creator. To reach the Content Creator, click ‘Create a Design‘ in the top right-hand corner of the Content Library.
To view all content in the Design section, click See All to the far right corner of the Design section. Doing so will take you to a full page view of your Design content.
In this view, you can search for content by file name in the Search field, you can filter by My Content vs. Community Content, and you can sort by alphabetical order and/or date of modification (editing).
To return to the Library view, click the large left-facing arrow in the top left corner of the page next to the title ‘Design‘.
The Documents section contains content created outside of Team Hub that has been uploaded as a PDF.
To upload documents, click the ‘Upload‘ button in the top right-hand corner of the Content Library.
To view all content in the Documents section, click See All to the far right corner of the Document section. Doing so will take you to a full page view of your uploaded Document content.
In this view, you can search for content by file name in the Search field, you can filter by My Content vs. Community Content, and you can sort by alphabetical order and/or date of modification (editing).
To return to the Library view, click the large left-facing arrow in the top left corner of the page next to the title ‘Document‘.
The Photos section contains any photos that have been uploaded to the Content Library.
To upload photos, click the ‘Upload‘ button in the top right-hand corner of the Content Library. Accepted formats are .jpg and .png. Maximum size accepted is 10 MB.
To view all content in the Photos section, click See All to the far right corner of the Photos section. Doing so will take you to a full page view of your uploaded photos.
In this view, you can search for content by file name in the Search field, you can filter by My Content vs. Community Content, and you can sort by alphabetical order and/or date of modification (editing).
To return to the Library view, click the large left-facing arrow in the top left corner of the page next to the title ‘Photo‘.
What is the Content Creator?
The Content Creator is a built-in content creation tool that empowers you to create designs that can be shared to the following endpoints: Plus, Digital Signage, Direct Broadcast and Print.
The Content Creator is found by navigating to your Team Hub Content Library. In the left-hand navigation of Team Hub, select Communications followed by Content Library. In the top right-hand corner of the Library, click “Create a Design“.
Create a Design: How to Open a New Design
There are endless possibilities of designs that can be created in the Content Creator, which can then be published to a variety of endpoints (Digital Signage, Plus App, Direct Broadcast, or Print) for residents to enjoy. But before diving into design, you have to create your slide first! In the following tutorial, we will break down how to create a slide, also called a design, in the Content Creator.
Create a Design: Setup Options
When creating or uploading a design to the Content Library, staff have a variety of options available. The first priority when creating a design though is understanding the use of the document once it is published in order to select the best setup for the design. For example, if you are creating a printable monthly calendar, the setup of the design will be different than that of a slide published to a digital signage screen in the community. Similarly, it is important to distinguish whether your design needs to be created as a landscape design or a portrait design.
Landscape Design
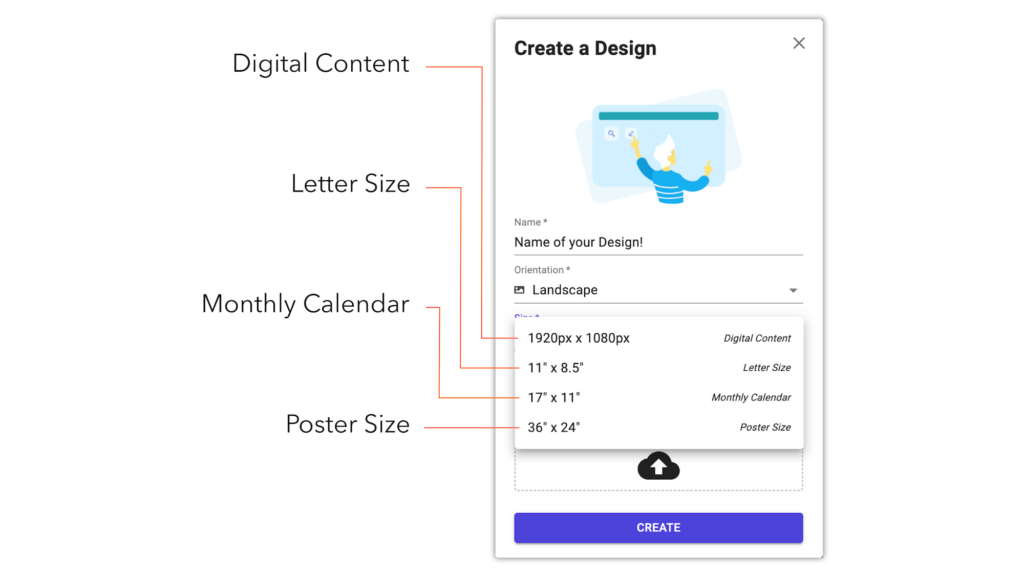
The Digital Content size (1920px x 1080 px) is optimized for the best performance and visibility when published to Digital Signage (landscape orientation) or Direct Broadcast. Always ensure you select the Digital Content size when creating content for either of these endpoints.
The Letter size (11″ x 8.5″) is optimized for the best performance and visibility when creating content that is intended to be printed on standard print paper.
The Monthly Calendar size (17″ x 11″) is optimized for the best performance and visibility when using the Monthly Calendar Widget. If you are creating a monthly calendar with intentions of publishing to Digital Signage, Direct Broadcast, or Print, be sure to select the Monthly Calendar size.
The Poster size (36″ x 24″) is optimized for the best performance and visibility when creating content that is intended to be printed on a large scale.
Portrait Design
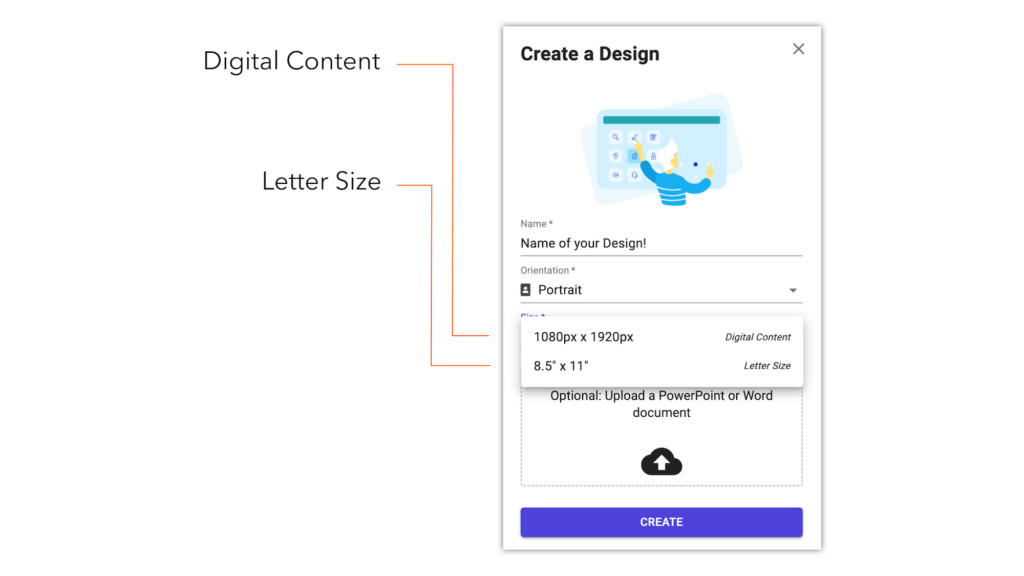
The Digital Content size (1080 px x 1920px) is optimized for the best performance and visibility when published to Digital Signage (portrait orientation) or Direct Broadcast. Always ensure you select the Digital Content size when creating content for either of these endpoints.
The Letter size (8.5″ x 11″) is optimized for the best performance and visibility when creating content that is intended to be printed on standard print paper.
How to Publish a Design
Once you are satisfied with the details of your design, you are now ready to publish. There are two ways to publish your design: directly from the Content Creator, or from the Content Library.
How to Publish from the Content Creator
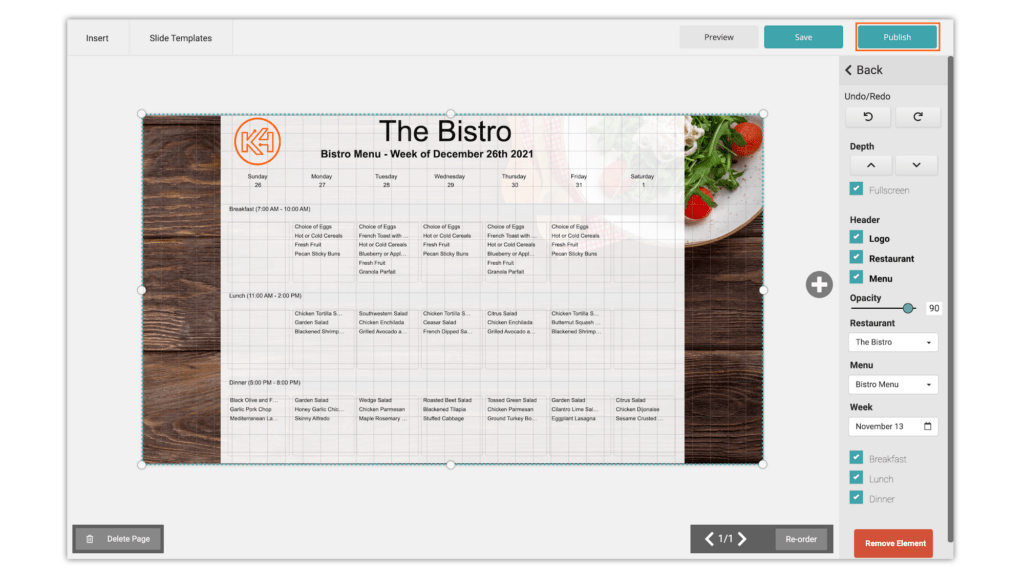
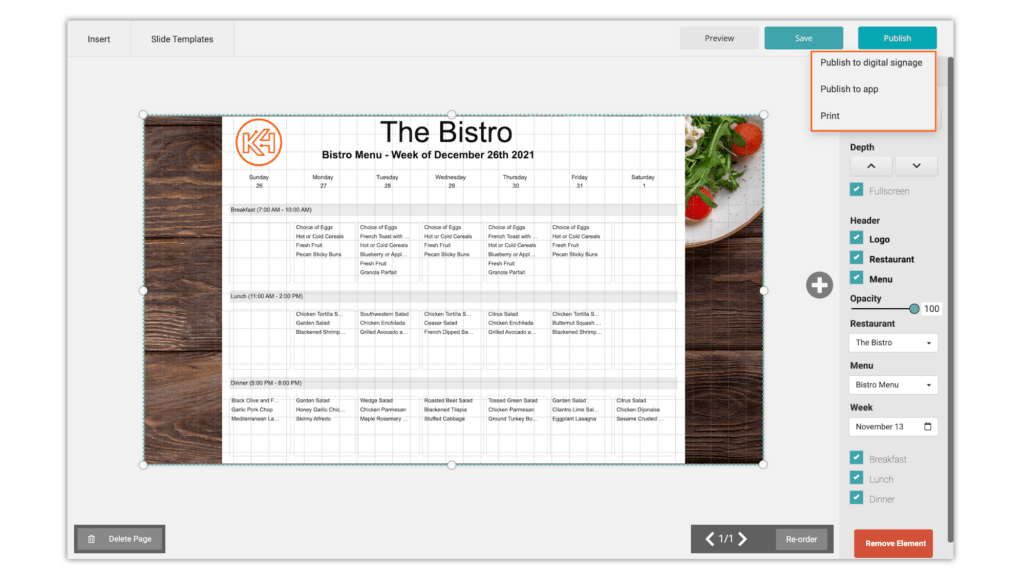
If you want to publish or print your design directly from the Content Creator, simply hover over the Publish button in the top right-hand corner of the Creator. You will be given the options to:
- Publish to digital signage
- Publish to app
If you want to publish your design to Digital Signage or Direct Broadcast, select “Publish to Digital Signage” to be taken directly to the Digital Signage Manager for publishing.
If you want to publish your design to the K4Community Plus App, select “Publish to App” to be taken directly to the Post Manager for publishing. Please note: designs do not auto update on a daily basis in the app, only on Digital Signage or Direct Broadcast.
If you want to Print your design, simply press “Print“.
How to Publish from the Content Library
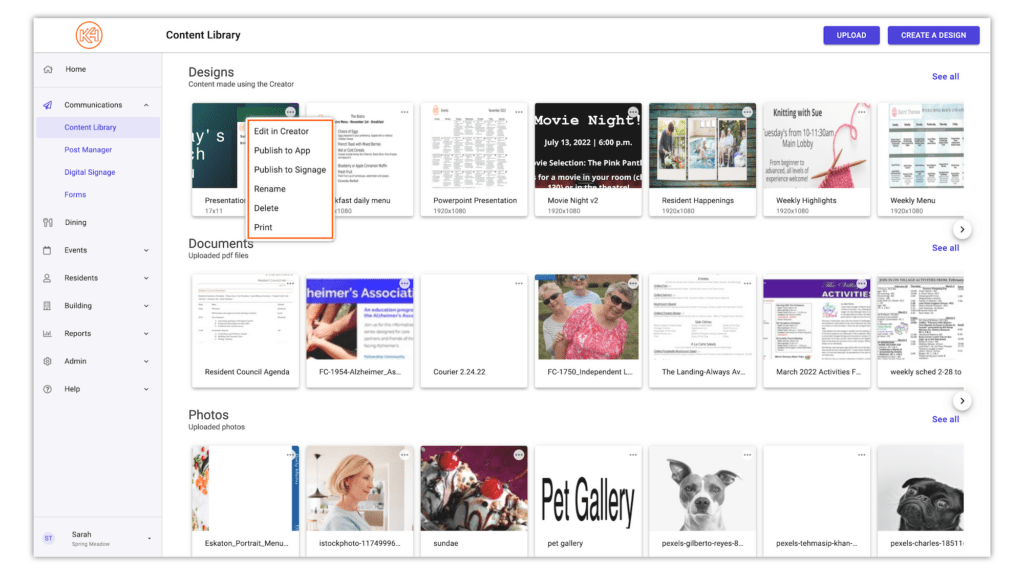
If in the event you needed to save your design for later or needed review from a collaborator prior to sharing with your community, publishing from the Content Library is simple. Once you have found your design in the Content Library, click the 3 dot menu in the top right-hand corner of the thumbnail. You will be presented with the options to:
- Edit in Creator
- Publish to App
- Publish to Signage
- Rename
- Delete
If you want to publish your design to Digital Signage or Direct Broadcast, select “Publish to Signage” to be taken directly to the Digital Signage Manager for publishing.
If you want to publish your design to the K4Community Plus App, select “Publish to App” to be taken directly to the Post Manager for publishing. Please note: designs do not auto update on a daily basis in the app, only on Digital Signage or Direct Broadcast.
If you want to Print your design, simply press “Print“.
How to Edit or Delete a Design
To edit OR delete existing content, click the three dot menu in the top right-hand corner of the piece of content you wish to edit or delete. You will then be presented with the options to either:
- Edit in Creator
- Publish to App
- Publish to Signage
- Rename
- Delete
If you wish to edit any part of the design, select Edit in Creator. If you wish to delete the design, select Delete.
Please Note:
Only designs created in the Content Creator can be edited in Team Hub. If your content was created outside of Team Hub, such as in PowerPoint or Canva, editing must be done where the content was sourced.
Content Creator Tutorials
Using a widget is easy, and there are a variety of options available to streamline your current workflows. To learn all about how to select, edit and publish widgets, click here to be taken to the Widgets page.
Available Widgets:
- Daily Weather
- 3 Day Weather
- Date/Time
- Today’s Events
- Daily Calendar
- Weekly Calendar
- Monthly Calendar
- Calendar Key
- Weekly Menu
- Daily Menu
- Website
